

Chapter 5: File Permissions
Foreword
We recommend that you do not use AI to do the exercises since you are in the learning phase.
Introduction
In this section, we will cover file management under Linux. More specifically, we’ll talk about permissions and access management on files.
Prerequisites
Same old story. 😉
File Management
File permissions
General information
Under Linux, file permissions are an essential barrier against unauthorized access.
- A file’s permissions restrict 3 actions:
- reading the file (characterized by the letter r)
- writing to or modifying the file (w)
- executing (binary, shell script, etc…) (x)
- Each of the 3 actions can be assigned to 3 types of user:
- the user who owns the file (characterized by the letter u)
- any user belonging to the file’s group (g)
- others (neither the file’s owner, nor the file’s group) (o)
These permissions can be viewed using the ls -l command, which displays them in the following symbolic form:
-rw-rw-r-- 1 widal widal 244 avril 23 01:48 pubspec.yaml
Let’s break down each part of this line:
-rw-rw-r--: This is the file’s permissions.-
The first character (
-) indicates that this is a regular file (rather than a directory or a symbolic link, for example). Below are all the file types with their character.`-`: regular file `d`: Directory `c`: Character device `b`: Block device `l`: Symbolic link `p`: Named pipe (IPC) `s`: Local socket (IPC) - The first three characters (
rw-) indicate the permissions for the file’s owner (here, “widal”). The owner can read and write to the file, but cannot execute it. - The next three characters (
rw-) indicate the permissions for the file’s group. The “widal” group can also read and write to the file, but cannot execute it. - The last three characters (
r--) indicate the permissions for other users (those who are neither the owner nor members of the group). These users can only read the file, but cannot write to it or execute it.
-
-
1: This indicates the number of hard links (that is, the number of file names pointing to this file) on the system. Generally, for a simple file, this is 1 (one). -
widal: The name of the file’s owner, here “widal”. -
widal: The name of the group associated with the file. Here too, the group is “widal”. -
244: The size of the file in bytes. This file weighs 244 bytes. -
avril 23 01:48: The date and time of the file’s last modification. Here, the file was modified on April 23 at 01:48. pubspec.yaml: This is the file’s name.
Summary:
The pubspec.yaml file belongs to the user “widal” and to the group “widal”; it is readable and writable by both of these entities, but only readable by others. It weighs 244 bytes and was last modified on April 23 at 01:48.
Changing file permissions
Under Linux, file and directory permissions define who can read, write, or execute a file. You can change these permissions with the chmod command. Changing permissions can be done in two main ways: using numbers or symbols.
1. Using Numbers with chmod
Each type of permission (read, write, execute) is represented by a digit:
- Read (
r) = 4 - Write (
w) = 2 - Execute (
x) = 1
Permissions are assigned via a three-digit number representing, respectively, the permissions for the owner, the group, and other users.
- The first digit is for the owner.
- The second digit is for the group.
- The third digit is for other users.
Examples:
chmod 755 file.txt: The owner has all rights (7=rwx; let’s break it down:7=r(4) + w(2) + x(1)), the group has read and execute rights (5=r-x), and others also have read and execute rights (5=r-x).chmod 644 file.txt: The owner has read and write rights (6=rw-), and others have read-only rights (4=r--).
2. Using Symbols with chmod
Permissions can also be specified using symbols:
+: Add a permission.-: Remove a permission.=: Explicitly set permissions.
Examples:
chmod u+x file.txt: Adds the execute permission for the owner (u= user).chmod g-w file.txt: Removes the write permission for the group (g= group).chmod o=r file.txt: Sets the permissions for other users to “read only” (o= others).
3. Using umask (ℹ️ Good to know!)
The umask command determines the default permissions of files and directories when you create them. The umask is a kind of “mask” that removes certain permissions from created files. By default, when a file is created, it has broad permissions (like 777 for a directory or 666 for a file), and the umask will adjust these permissions according to the specified values.
The umask command can be used to display or change the default permissions mask.
- For example, if
umaskis set to022, this means that new files will have default permissions of644(that is, other users cannot write to the file). - If
umaskis set to0777, all files will have very restrictive permissions.
Example:
umask 0022: For a file, the permissions will be644(owner:rw-, group and others:r--).umask 0777: For a file, the permissions will be000, which prevents any access to the file.
4. Bonus: Managing permissions when copying a file ( cp -p )
The cp command is used to copy files or directories. The -p option of cp lets you preserve the source file’s attributes during the copy, such as:
- The permissions.
- The owner.
- The modification date.
For example:
cp -p source_file.txt copy_file.txt
This creates a copy of the file while keeping the same permissions and other metadata as the original file.
Table of permissions and chmod values
| Permission | Numeric value | Description | Associated symbols |
|---|---|---|---|
Read (r) |
4 | Read the file | r |
Write (w) |
2 | Modify the file | w |
Execute (x) |
1 | Execute the file | x |
| None | 0 | No permission |
| Command | Owner (u) | Group (g) | Others (o) | Typical use case |
|---|---|---|---|---|
chmod 777 file.txt |
rwx | rwx | rwx | All rights for everyone (generally to be avoided) |
chmod 750 file.txt |
rwx | r-x | — | Full access for the owner, read-only for the group, no access for others |
chmod 640 file.txt |
rw- | r– | — | File readable/writable by the owner, readable by the group only |
chmod 755 file.txt |
rwx | r-x | r-x | Classic case for a shared script or executable |
chmod 644 file.txt |
rw- | r– | r– | Classic case for a non-executable text/config file |
chmod 000 file.txt |
— | — | — | No access for anyone (except root) |
Practical example
Let’s imagine you have a file script.sh with the following permissions:
-rw-r--r-- 1 user group 1000 avril 23 01:48 script.sh
If you want to give execute permissions to all users, you can do:
chmod +x script.sh
This will change the permissions to give execute rights:
-rwxr-xr-x 1 user group 1000 avril 23 01:48 script.sh
You can also use cp -p to copy a file while preserving its permissions and owner:
cp -p script.sh /path/to/new_script.sh
This will keep the same metadata and permissions in the copy.
Managing a file’s owner and group
- Every file has a single owner and a single group it belongs to
- Generally, the file’s initial owner is the user tied to the process that created the file
- The file’s initial group is the base group of the user tied to the process that created the file
Below is a table showing how a file’s owner and group are managed.
| Command | Description |
|---|---|
chown alice file.txt |
Changes the file’s owner to alice. |
chown alice:dev file.txt |
Changes the owner to alice and the group to dev. |
chown -R alice:dev /path/to/folder |
Recursively changes the owner and group in a directory. |
chgrp dev file.txt |
Changes the file’s group to dev. |
chgrp -R dev /path/to/folder |
Recursively changes the group in a directory. |
ls -l file.txt |
Displays the file’s permissions, owner, and group. |
The Sticky Bit ( Good to know!)
The sticky bit is a special permission that can be set on a directory. When enabled, this bit changes the behavior of files placed in that directory. It essentially lets you restrict file deletion to the file’s owner. In other words, only the owner of a file or the administrator (root) can delete or rename that file in a directory marked with the sticky bit, even if other users have write permissions on the directory.
Usefulness of the Sticky Bit
The sticky bit is often used on shared directories, such as /tmp, where many users can create and modify files, but where it’s essential that users cannot delete or modify other users’ files.
Typical use case:
- The
/tmpdirectory: This is a directory used by the system and users to store temporary files. It’s common to set the sticky bit on this directory to prevent users from deleting files created by other users in it.
How do you set and check the Sticky Bit?
1. Setting the Sticky Bit
To set the sticky bit, you use the chmod command with +t. This is generally done on directories. For example:
chmod +t /tmp
This command adds the sticky bit to the /tmp directory. If you want to check that the sticky bit is enabled, you can use the ls -ld command to display the directory’s permissions:
ls -ld /tmp
The output might look like this:
drwxrwxrwt 10 root root 4096 avril 23 10:00 /tmp
Here, the t in the rwxrwxrwt permissions (instead of x at the end) indicates that the sticky bit is enabled.
2. Removing the Sticky Bit
If you want to remove the sticky bit from a directory, you can use the following command:
chmod -t /tmp
This removes the sticky bit, and users with write permissions on that directory can then delete or modify other users’ files.
Summary - Sticky Bit Behavior
-
With the sticky bit: If the sticky bit is enabled on a directory, only the file’s owner and root can delete or rename that file. Other users with write permissions on the directory cannot affect files belonging to other users.
-
Without the sticky bit: If the sticky bit is not enabled, all users with write permissions on the directory can delete or rename other users’ files, regardless of who owns them.
SETUID and SETGID
SETUID (Set User ID) and SETGID (Set Group ID) are special bits that can be set on executable files under Linux. When enabled, these bits change how the system handles the execution of files. Their main purpose is to grant temporary permissions for running a program, allowing a user to execute a file with the permissions of another user (usually a privileged user, such as root).
SETUID (Set User ID)
- Purpose: Allows a user to execute a file with the permissions of the file’s owner, not those of the user launching the execution.
- Use case: This is often used for programs that require elevated privileges to accomplish a specific task, such as
passwd(changing a password), which must be run with root privileges, even if the user running it isn’t root.
Example:
chmod u+s /path/to/file
This adds the SETUID bit to an executable file.
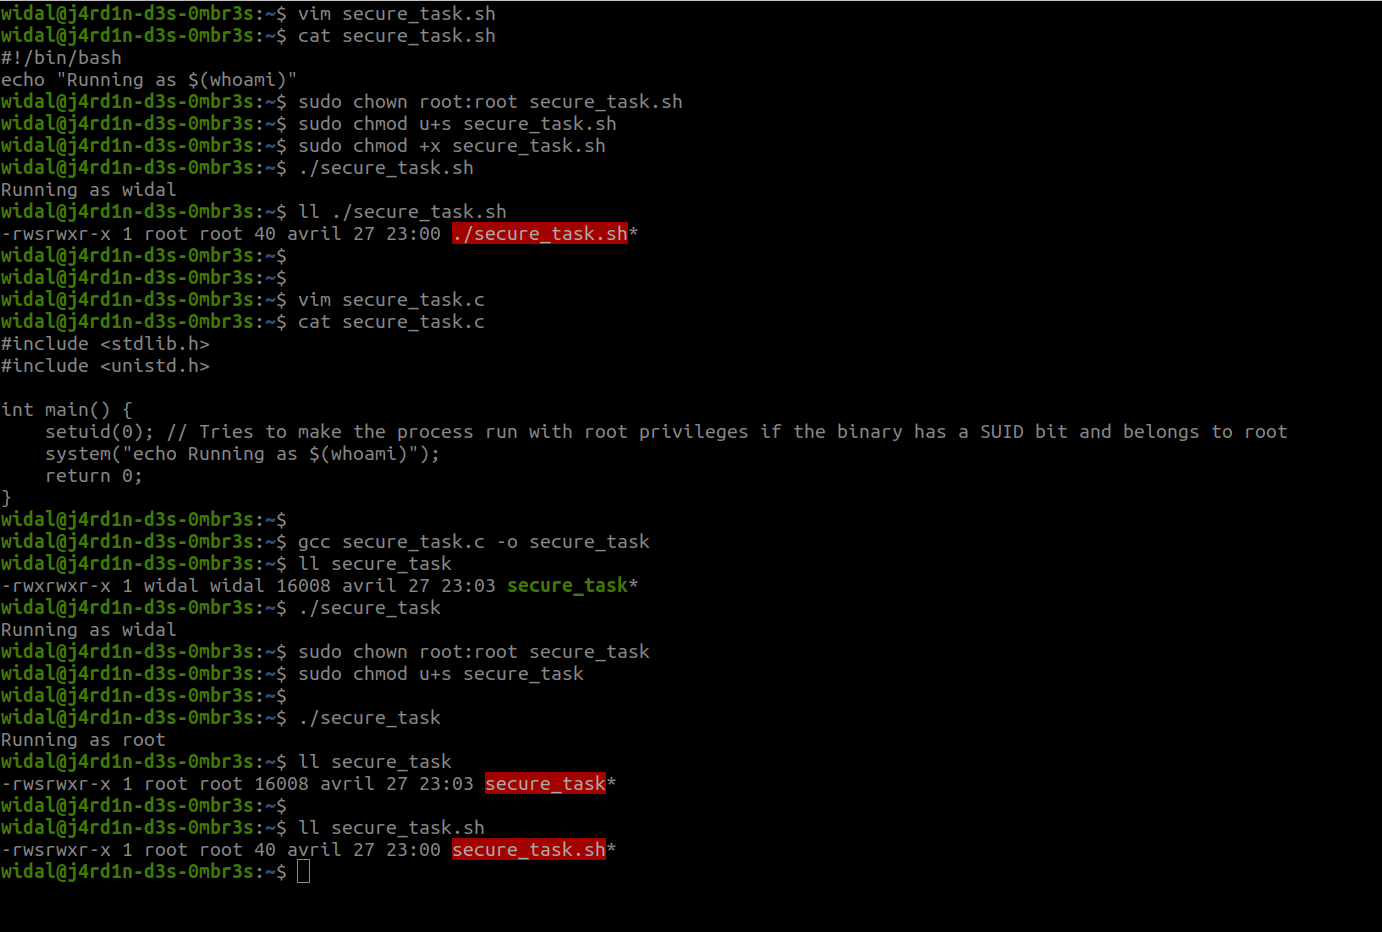
Important point: Modern Linux systems do not allow SETUID on shell scripts (like .sh files) for security reasons. The script will therefore run with the privileges of the current user, not those of the owner (root), even if the SETUID bit is active.
To test (without being root) 👨🏾💻👩🏾💻:
- Open your terminal
- Run:
  $ ls -l /usr/bin/passwd ## You'll see the 's' representing the SETUID bit in the owner part. This binary file belongs to root, but everyone can execute it as root.

  $ passwd ## this lets you change your password without using 'sudo', thanks to the SETUID bit.
SETGID (Set Group ID)
- Purpose: Allows a user to execute a file with the permissions of the file’s group, rather than the permissions of the group of the user launching the execution.
- Use case: Very useful for shared programs or directories where it’s important to maintain specific group permissions.
Example:
chmod g+s /path/to/file
This adds the SETGID bit to an executable file or a directory.
In summary:
- SETUID: Allows a file to be executed with the permissions of the file’s owner (often root).
- SETGID: Allows a file to be executed with the permissions of the file’s group.
These two bits are mainly used for managing temporary permissions when running programs, and must be used with caution to avoid security issues.
Important point: Modern Linux systems do not allow SETUID and SETGID on shell scripts (like .sh files) for security reasons. The script will therefore run with the privileges of the current user, not those of the owner (root), even if the SETUID bit is active. See the screenshot below.
Training ⚔️
Exercise 1
- Do some research on:
- setfacl
- getfacl
- inodes (in the context of Linux, of course!)
Exercise 2 (🧪)
Run the script to start the challenge like a boss 😉.
- Link to the challenge script: https://raw.githubusercontent.com/N0vachr0n0/NoFD/refs/heads/main/FilesPerms_EXO_1.sh
Exercise 3 (Deep Dive)
- Complete this challenge: https://sadservers.com/scenario/budapest
Feedback
Let us know what you think of this chapter.
👉🏾 Click here